10 Fun and Creative Lunchbox Ideas Your Kids Will Adore
Finding fun and tasty lunch options for kids can be challenging, but it doesn’t have to be! Here are 10 creative lunchbox ideas that are sure to please even the pickiest eaters. Packed with flavor and colorful ingredients, these meals will keep lunchtime exciting and appetizing.
Mini Pita Pockets with Hummus
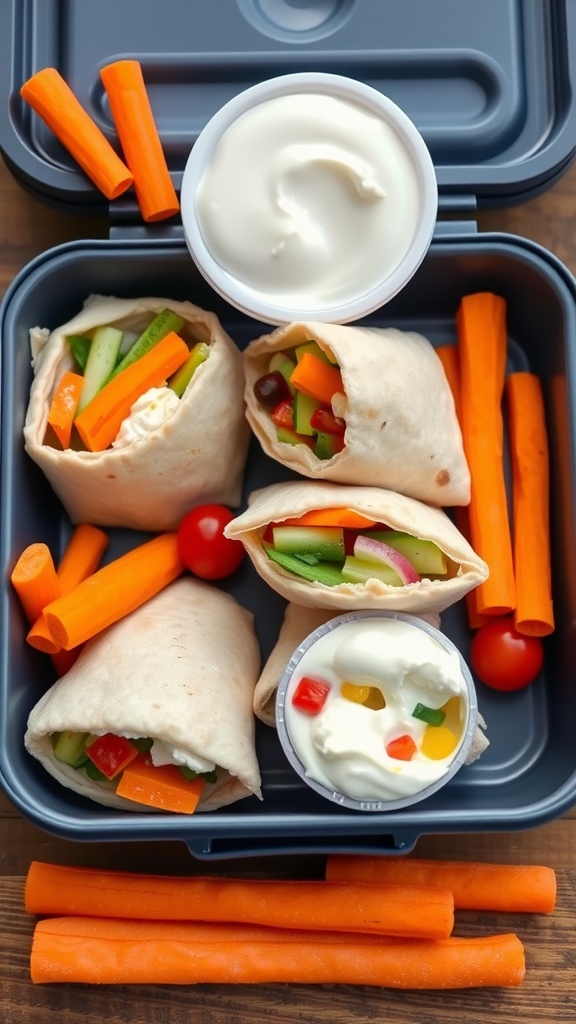
Mini pita pockets filled with hummus and fresh veggies are a hit for lunchboxes! They offer a delightful crunch and a burst of flavors, making lunchtime exciting for kids. These little pockets are easy to prepare and can be customized with your child’s favorite vegetables.
Perfectly portable and fun to eat, these mini pita pockets are not only nutritious but also a fantastic way to sneak in some healthy ingredients. Whether it’s a busy school day or a picnic in the park, these pita pockets are sure to please. Let’s get cooking!
Fruit and Cheese Kabobs
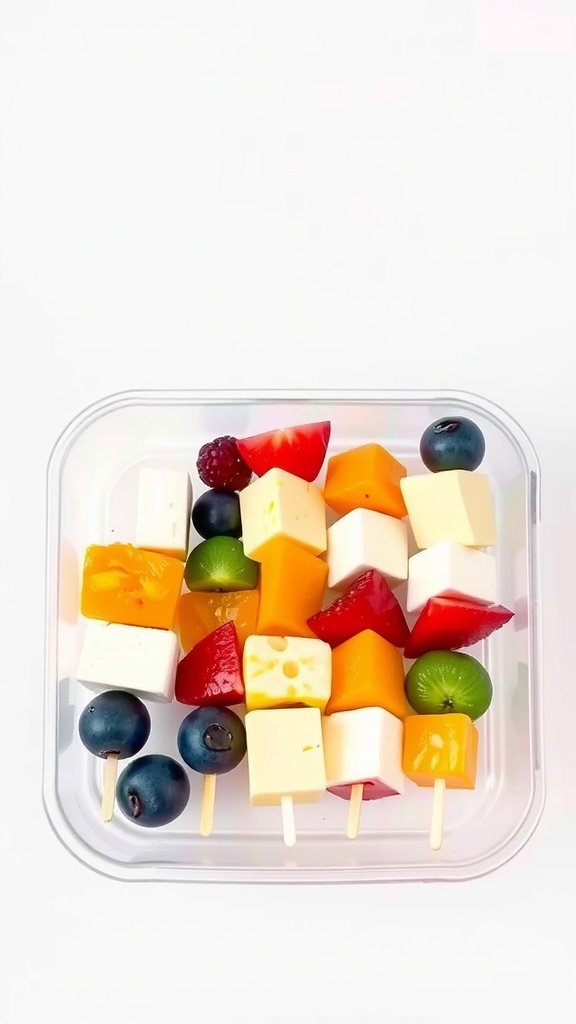
Fruit and cheese kabobs are a fun and tasty way to pack a balanced lunch. They combine the sweetness of fresh fruit with the creamy richness of cheese, making each bite a delightful experience. Plus, they’re super easy to assemble, which is a win for busy parents!
Perfect for lunchboxes or snacks, these kabobs can be customized with your child’s favorite fruits and cheeses. They not only look colorful and appetizing but also provide a mix of flavors and textures that kids will love. Serve them with a side of yogurt or a drizzle of honey for an extra treat!
Ingredients
- 1 cup cubed cheese (like cheddar, mozzarella, or gouda)
- 1 cup assorted fruits (such as strawberries, blueberries, grapes, and melon)
- Wooden skewers or toothpicks
- Optional: honey or yogurt for dipping
Instructions
- Prepare the Fruit: Wash and cut the fruits into bite-sized pieces.
- Assemble the Kabobs: Take a skewer or toothpick and alternate threading pieces of cheese and fruit. Get creative with the order!
- Serve: Arrange the kabobs on a plate and, if desired, serve with a side of honey or yogurt for dipping.
- Store: Keep any leftovers in the fridge for a quick snack later.
Rainbow Veggie Wraps
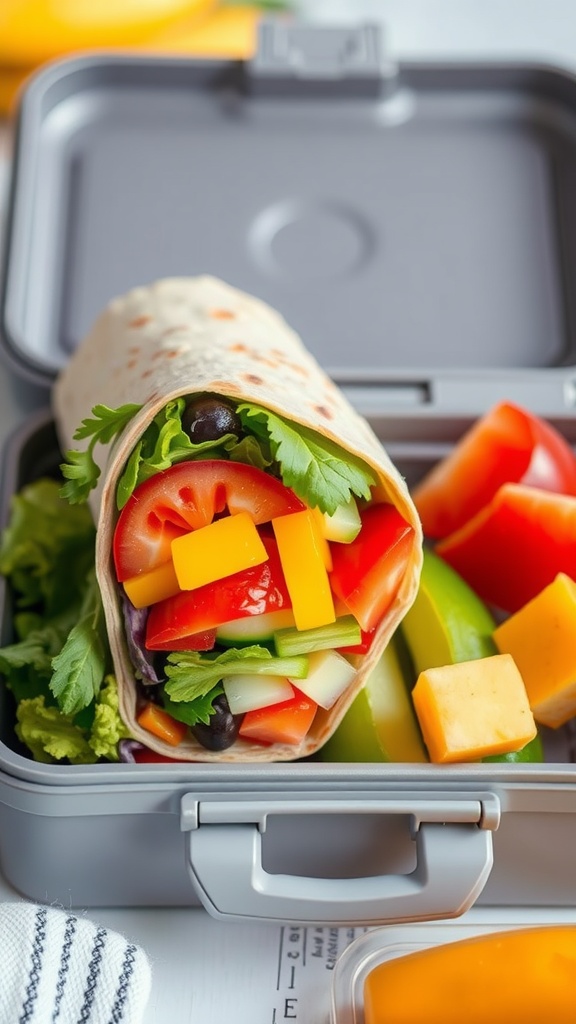
Rainbow veggie wraps are a fun and colorful way to liven up lunch. Packed with fresh vegetables and vibrant flavors, these wraps are not only visually appealing but also delicious and healthy. Making them is super easy and perfect for getting kids involved in the kitchen!
These wraps can be customized to suit your child’s taste. With a variety of crunchy veggies and tasty spreads, they offer a delightful mix of textures and flavors. Plus, they are easy to pack and great for on-the-go meals.
Ingredients
- 4 large whole wheat tortillas
- 1 cup hummus or cream cheese
- 1 cup shredded lettuce
- 1 cup sliced bell peppers (red, yellow, green)
- 1 cup diced cucumbers
- 1 cup cherry tomatoes, halved
- 1/2 cup black olives, sliced
- 1/2 cup shredded carrots
- 1/4 cup fresh cilantro or parsley
Instructions
- Spread hummus or cream cheese evenly over each tortilla.
- Layer the shredded lettuce, followed by the bell peppers, cucumbers, cherry tomatoes, olives, carrots, and cilantro.
- Carefully roll the tortilla tightly from one end to the other.
- Slice each wrap into bite-sized pieces and pack in a lunchbox.
- Enjoy with a side of extra veggies or a dip!
Veggie and Dip Cups
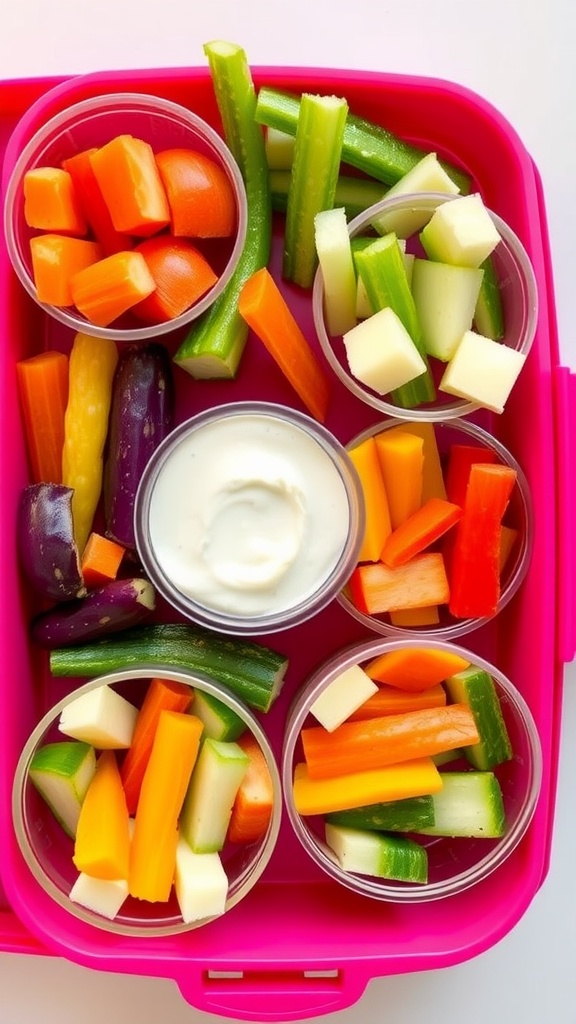
Veggie and dip cups are a fun and colorful way to encourage your kids to munch on their vegetables. They combine a variety of fresh veggies with a delicious dip, making them enjoyable and healthy. Plus, they are super simple to prepare, which is a win for busy parents!
These cups are not only visually appealing with their vibrant colors but also pack a crunch that kids love. You can customize the veggies and dips according to your child’s preferences. This makes them perfect for lunchboxes or after-school snacks!
Breakfast for Lunch: Pancake Sandwiches
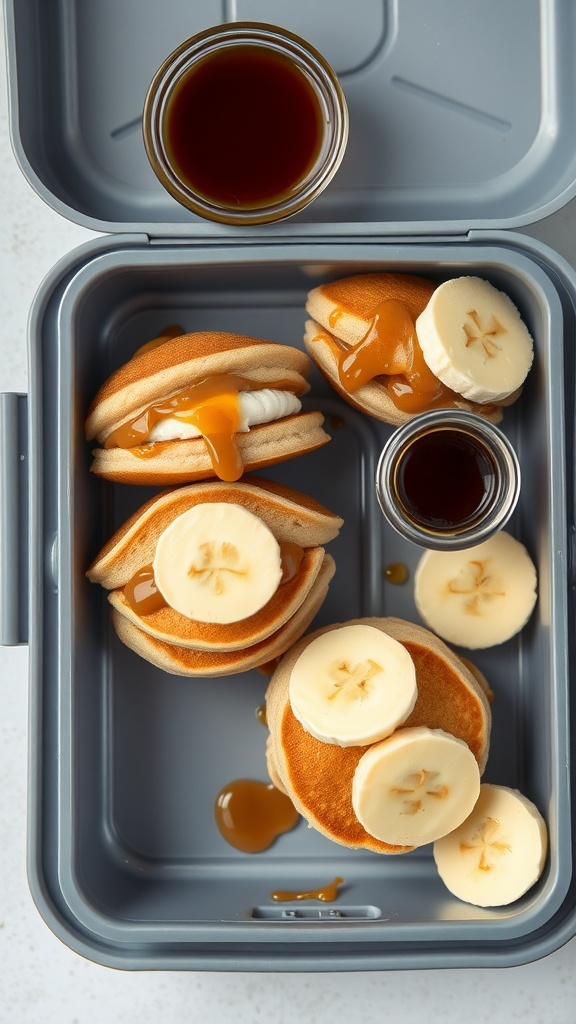
Pancake sandwiches are a fun twist on a classic breakfast favorite, perfect for lunchboxes! These sweet treats combine fluffy pancakes with delicious fillings, making them a hit with kids. The combination of warm pancakes, creamy fillings, and fresh fruit creates a delightful taste that feels indulgent yet wholesome.
Assembling pancake sandwiches is super easy, and they can be customized to suit your child’s preferences. Whether they prefer syrup, whipped cream, or fruit, these sandwiches cater to every taste. Let’s jump into the recipe!
Ingredients
- 1 cup all-purpose flour
- 2 tablespoons sugar
- 1 teaspoon baking powder
- 1/2 teaspoon baking soda
- 1/4 teaspoon salt
- 1 cup buttermilk
- 1 large egg
- 2 tablespoons melted butter
- Whipped cream or cream cheese for filling
- Sliced bananas
- Syrup for drizzling
Instructions
- Mix Dry Ingredients: In a bowl, whisk together the flour, sugar, baking powder, baking soda, and salt.
- Combine Wet Ingredients: In another bowl, mix the buttermilk, egg, and melted butter.
- Combine Mixtures: Pour the wet ingredients into the dry ingredients and stir until just combined. Be careful not to overmix.
- Cook the Pancakes: Heat a non-stick skillet over medium heat. Pour about 1/4 cup of batter for each pancake. Cook until bubbles form, then flip and cook until golden brown.
- Assemble: Spread whipped cream or cream cheese between two pancakes, add sliced bananas, and drizzle with syrup. Top with a third pancake if desired.
Sushi Rolls with a Twist
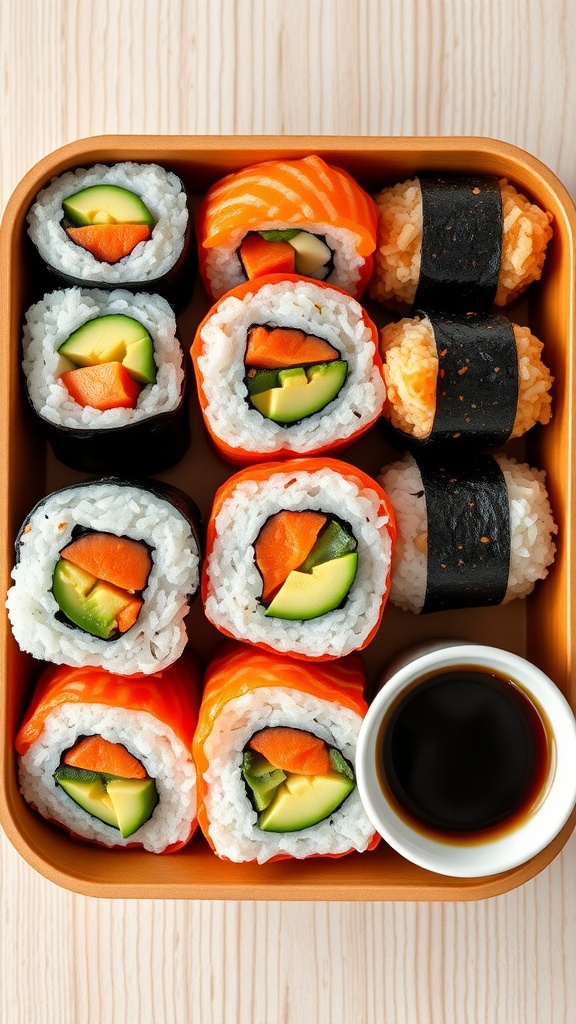
Sushi rolls can be a fun and tasty addition to your child’s lunchbox. These sushi rolls with a twist combine fresh vegetables and flavors that kids will love, making lunchtime exciting and nutritious. Plus, they are simple to make, allowing you to get creative in the kitchen without a lot of fuss.
Using ingredients like cucumbers, carrots, and avocado, you can create colorful rolls that are as pleasing to the eye as they are to the palate. The hint of sweetness from the rice paired with the crunchy veggies provides a delightful contrast. Let’s dive into this easy recipe that’s perfect for a lunchbox treat!
Ingredients
- 2 cups sushi rice
- 2 1/2 cups water
- 1/4 cup rice vinegar
- 1 tablespoon sugar
- 1 teaspoon salt
- 4 sheets nori (seaweed)
- 1 small cucumber, julienned
- 1 small carrot, julienned
- 1 avocado, sliced
- 2 ounces smoked salmon (optional)
- Soy sauce for dipping
Instructions
- Prepare the Sushi Rice: Rinse the sushi rice under cold water until the water runs clear. In a saucepan, combine the rice and water, bring to a boil, then reduce to low heat. Cover and simmer for about 20 minutes until the water is absorbed. Remove from heat and let it sit for 10 minutes.
- Season the Rice: In a small bowl, mix the rice vinegar, sugar, and salt until dissolved. Gently fold this mixture into the cooked rice, letting it cool to room temperature.
- Assemble the Rolls: Lay a sheet of nori shiny side down on a bamboo mat. Wet your hands and spread a thin layer of rice over the nori, leaving about an inch at the top. Place a line of cucumber, carrot, avocado, and smoked salmon (if using) across the center.
- Roll it Up: Starting from the bottom, carefully roll the sushi away from you, using the mat to help. Press gently but firmly as you roll, sealing the edge with a little water.
- Slice and Serve: Using a sharp knife, slice the roll into bite-sized pieces. Serve with a side of soy sauce for dipping!
Taco Salad Jars
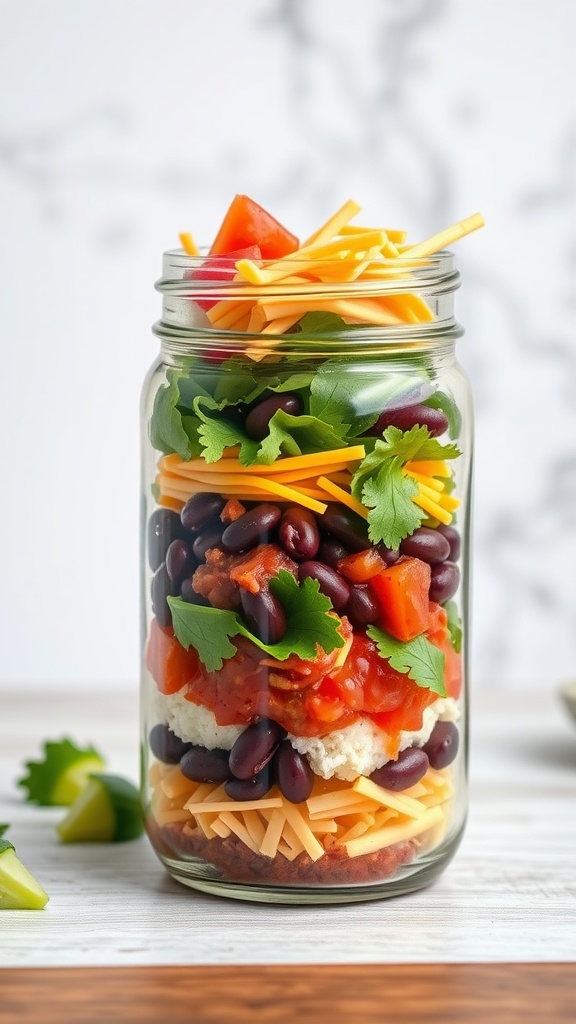
Taco Salad Jars are a fun and vibrant way to bring some excitement to your kid’s lunchbox. These layered salads are packed with delicious flavors and textures, making them a hit with kids and adults alike. They are incredibly easy to prepare, allowing you to customize each jar to suit your child’s tastes. Just toss together some fresh ingredients, layer them in a jar, and you’re ready to go!
Each jar features a delightful mix of crunchy lettuce, savory beans, and zesty salsa, all topped with cheese and fresh veggies. It’s a nutritious option that feels like a treat. Plus, they can be made ahead of time, making lunch prep a breeze!
Ingredients
- 1 cup cooked quinoa or rice
- 1 can black beans, rinsed and drained
- 1 cup cherry tomatoes, halved
- 1 cup corn (fresh or canned)
- 1 cup shredded lettuce
- 1 cup shredded cheddar cheese
- 1/2 cup salsa
- 1/4 cup fresh cilantro, chopped
- 1 avocado, diced (optional)
- Juice of 1 lime
Instructions
- Start by preparing your ingredients. Cook the quinoa or rice according to package instructions and let it cool. Rinse and drain the black beans.
- In a large mason jar, begin by layering the quinoa or rice at the bottom, followed by black beans, corn, cherry tomatoes, and shredded lettuce.
- Next, add a layer of salsa and top with shredded cheese. If you’re using avocado, add it here as well.
- Finish with a sprinkle of chopped cilantro and a squeeze of lime juice on top.
- Seal the jar tightly and store it in the fridge. These can be made a day ahead for easy lunches!
DIY Mini Pizza Kits
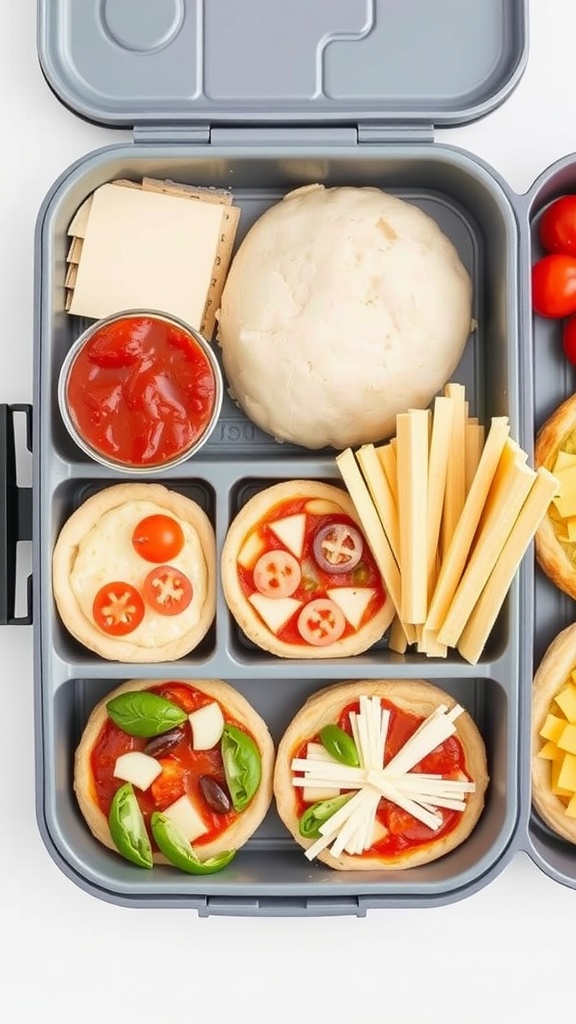
DIY Mini Pizza Kits are a fun and simple way to let kids unleash their inner chefs. With a variety of toppings to choose from, these mini pizzas are not only tasty but also customizable, ensuring every kid gets their pizza just the way they like it. The hands-on experience of assembling their own pizzas can make lunchtime exciting and encourage picky eaters to try new flavors!
This recipe is perfect for busy parents looking to add creativity to their kids’ lunchboxes. Simply pack some dough, sauce, and a selection of fresh toppings, and let the fun begin! Not only will your kids enjoy making their mini pizzas, but they’ll also love eating them!
Ingredients
- 1 premade pizza dough
- 1/2 cup pizza sauce
- 1 cup shredded mozzarella cheese
- 1/2 cup cherry tomatoes, halved
- 1/2 cup sliced bell peppers
- 1/4 cup sliced olives
- 1/4 cup fresh basil leaves
- 1/4 cup grated Parmesan cheese
Instructions
- Prepare the Dough: Roll out the premade pizza dough on a floured surface. Cut it into small circles using a cookie cutter or a glass, making enough for each mini pizza.
- Pack the Ingredients: In a lunchbox, add the cut dough, a small container of pizza sauce, and compartments for the mozzarella cheese and assorted toppings.
- Assemble the Pizzas: At lunchtime, let the kids spread the sauce on their dough circles, sprinkle with mozzarella cheese, and add their favorite toppings.
- Bake: Preheat the oven to 400°F (200°C). Place the assembled mini pizzas on a baking sheet and bake for about 10-12 minutes, or until the cheese is melted and bubbly.
- Enjoy: Let them cool for a few minutes before serving, and watch your kids enjoy their delicious creations!
Cheesy Quinoa Bites
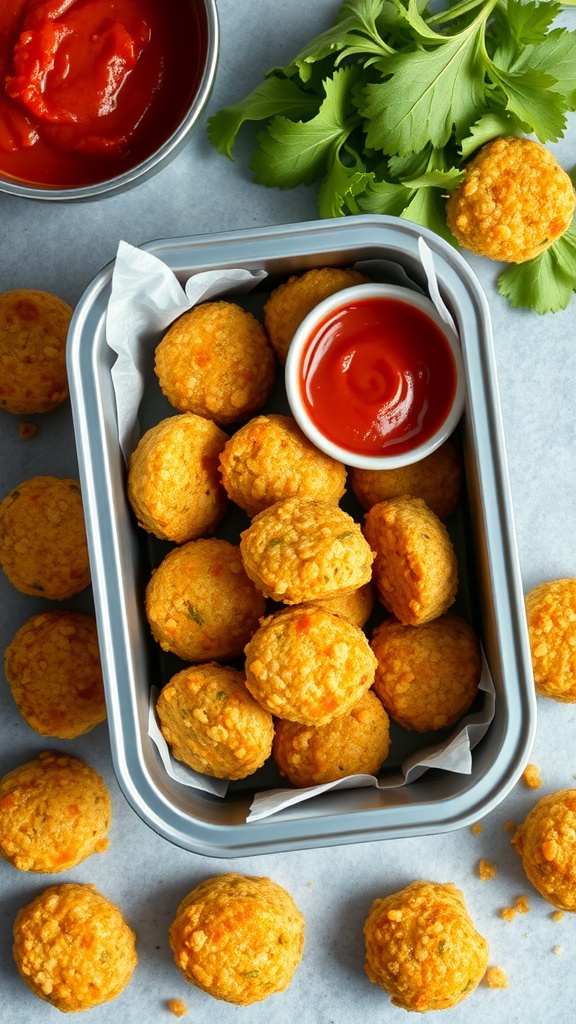
Cheesy quinoa bites make for a fun and nutritious lunch option that kids will enjoy. These little snacks are packed with flavor and have a delightful cheesy texture that makes them irresistible. Plus, they’re simple to whip up, which is always a win for busy parents!
With crispy outsides and soft, cheesy centers, they are perfect for dipping in your child’s favorite sauce. You can customize the ingredients based on what your kids like, making them a versatile choice for any lunchbox!
Ingredients
- 1 cup cooked quinoa
- 1 cup shredded cheese (cheddar or mozzarella)
- 1/2 cup breadcrumbs
- 1/4 cup grated carrots
- 1/4 cup chopped spinach
- 2 large eggs
- 1/2 teaspoon garlic powder
- Salt and pepper to taste
Instructions
- Preheat the oven to 375°F (190°C) and lightly grease a mini muffin tin.
- In a bowl, mix together cooked quinoa, cheese, breadcrumbs, carrots, spinach, eggs, garlic powder, salt, and pepper until well combined.
- Scoop the mixture into the muffin tin, filling each cup about three-quarters full.
- Bake for 15-20 minutes, or until the bites are golden and set.
- Allow to cool slightly before removing from the tin. Serve with your favorite dipping sauce!
Chocolate-Dipped Fruit Bars

Chocolate-dipped fruit bars are a delightful treat that kids will love in their lunchboxes! Combining the sweetness of fruit with rich chocolate makes these bars a fun and healthy snack. They’re easy to make, requiring minimal prep time, and can be customized with various fruits and nuts.
These bars offer a perfect balance of crunch and chewiness, making them a hit with children. They can be made ahead of time and stored in the fridge for a quick grab-and-go option. Add these to your lunch ideas, and watch the smiles grow!
Ingredients
- 2 cups rolled oats
- 1/2 cup honey or maple syrup
- 1/2 cup nut butter (peanut or almond)
- 1 cup chopped dried fruits (like apricots or cranberries)
- 1/2 cup chopped nuts (almonds or walnuts)
- 1/2 teaspoon vanilla extract
- 1 cup dark chocolate chips
Instructions
- Mix Ingredients: In a large bowl, combine oats, honey, nut butter, dried fruits, chopped nuts, and vanilla extract. Stir until everything is well combined.
- Shape Bars: Line an 8×8-inch baking dish with parchment paper. Press the mixture evenly into the dish, making sure to compact it well.
- Chill: Place the dish in the refrigerator for about 30 minutes until the mixture is firm.
- Prepare Chocolate: Melt the dark chocolate chips in a microwave-safe bowl in 30-second increments, stirring in between until smooth.
- Dip Bars: Once the mixture is set, cut it into bars. Dip each bar halfway into the melted chocolate and place it back on the parchment paper. Sprinkle chopped nuts on top if desired.
- Set: Allow the chocolate to harden at room temperature or refrigerate for about 15 minutes.