15 Creative Lunchbox Ideas Your Kids Will Adore
Looking for some fresh and exciting lunchbox ideas that your kids will actually eat? Look no further! Here are 15 creative and fun lunchbox ideas that are sure to bring smiles to their faces and keep lunchtime interesting. Whether it’s vibrant wraps, quirky snacks, or tasty dips, you’ll find plenty of options to keep your little ones happy and healthy.
Peanut Butter Banana Sushi
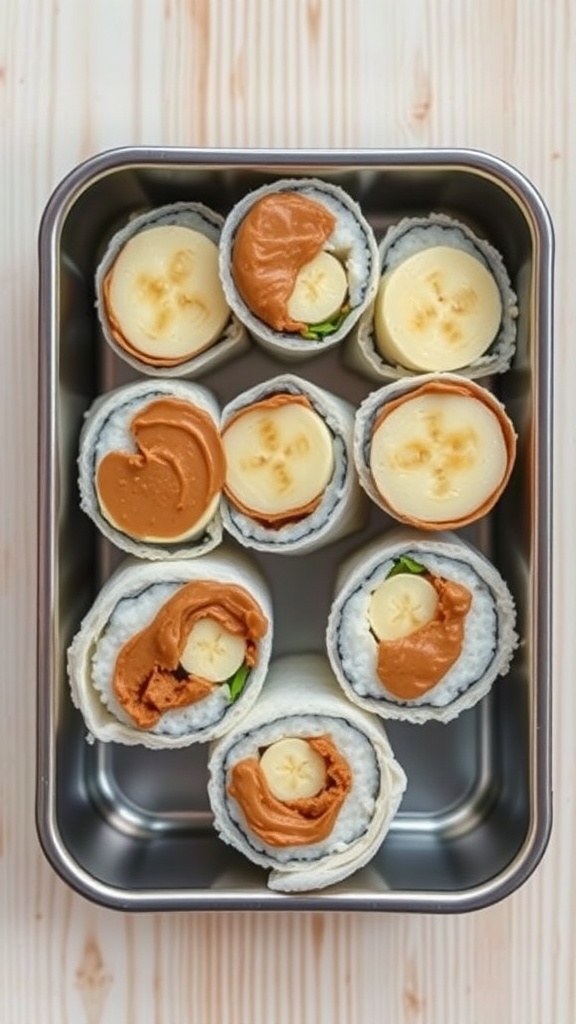
Peanut Butter Banana Sushi is a fun and tasty twist on traditional sushi that kids will adore. This simple recipe combines creamy peanut butter, fresh bananas, and soft tortillas, creating a delightful and nutritious lunchbox treat. The sweet taste of banana pairs perfectly with the nutty flavor of peanut butter, making it an irresistible snack.
Making these sushi rolls is quick and easy, perfect for busy parents! Just spread the peanut butter, add the banana, roll it up, and slice. It’s a fun way to get kids involved in the kitchen, and they can even customize their rolls with different spreads or fruits.
Fruit and Cheese Kabobs
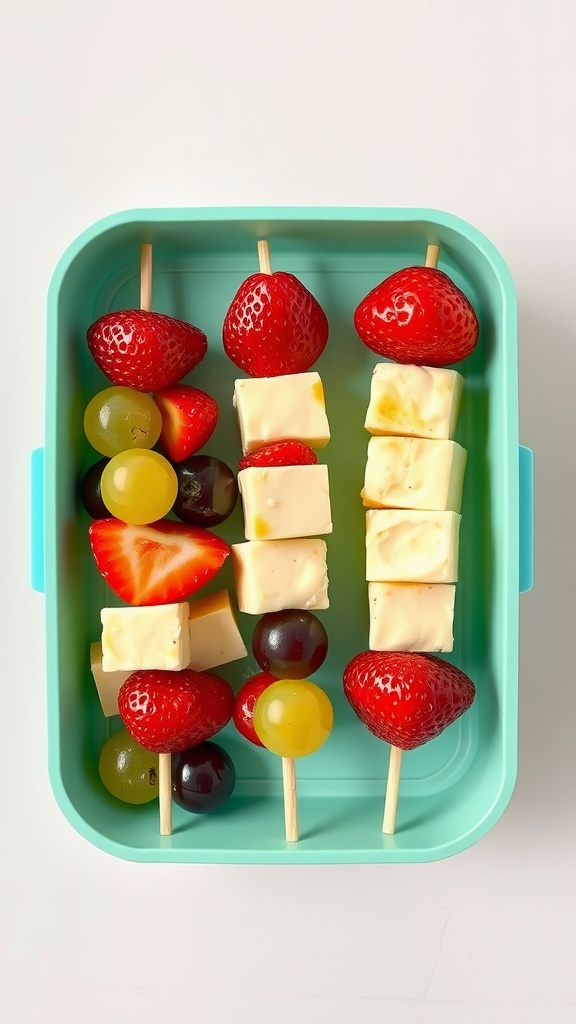
Fruit and cheese kabobs are a delightful and easy lunchbox idea that kids will love. These colorful skewers combine the sweetness of fresh fruit with the creamy texture of cheese, making them a tasty treat that is both nutritious and fun to eat. The simple assembly allows for creativity; kids can pick their favorite fruits and cheeses, making each kabob unique.
Perfect for lunchboxes or snacks, these kabobs are not only quick to prepare but also visually appealing. They pack a flavorful punch that will keep kids energized throughout the day. Plus, they’re a great way for little ones to explore different flavor combinations!
Ingredients
- 1 cup strawberries, hulled
- 1 cup grapes (red and green)
- 1 cup cubed cheese (like cheddar or mozzarella)
- Wooden skewers
Instructions
- Gather all the ingredients and cut the cheese into bite-sized cubes.
- Take a skewer and start threading the ingredients: place a grape, followed by a cheese cube, and then a strawberry. Repeat until the skewer is filled.
- Once all the kabobs are assembled, pack them in a lunchbox or serve immediately. Enjoy the colorful and delicious combination!
Mini Pizza Bagels
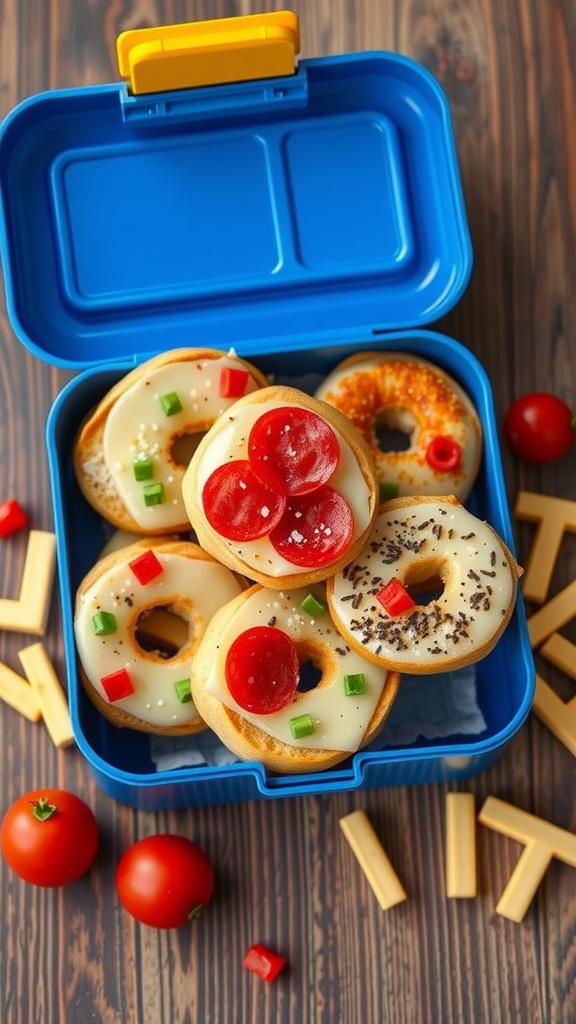
Mini pizza bagels are a fun and tasty option for kids’ lunches. They’re bite-sized, easy to make, and packed with flavor. The blend of gooey cheese, zesty sauce, and your favorite toppings will have kids excited to dig in. Plus, they can customize their own, making lunchtime more interactive!
These mini pizzas are a simple recipe that requires just a few ingredients. Whether you’re pressed for time or want to involve your kids in the kitchen, these bagels are a quick solution that everyone will love.
Ingredients
- 8 mini bagels
- 1 cup pizza sauce
- 1 ½ cups shredded mozzarella cheese
- 1 cup assorted toppings (pepperoni, bell peppers, olives, etc.)
- 1 teaspoon Italian seasoning
- Cooking spray
Instructions
- Preheat the Oven: Set your oven to 375°F (190°C) and prepare a baking sheet with cooking spray.
- Prepare the Bagels: Split the mini bagels in half and place them cut-side up on the baking sheet.
- Add Sauce and Cheese: Spread a spoonful of pizza sauce on each bagel half, followed by a generous amount of shredded mozzarella cheese.
- Add Toppings: Sprinkle your choice of toppings on top of the cheese. Be creative!
- Season: Lightly sprinkle Italian seasoning over each bagel for added flavor.
- Bake: Place the baking sheet in the oven and bake for about 10-12 minutes, or until the cheese is melted and bubbly.
- Cool and Serve: Allow the mini pizza bagels to cool for a few minutes before serving. Enjoy!
Rainbow Veggie Wraps
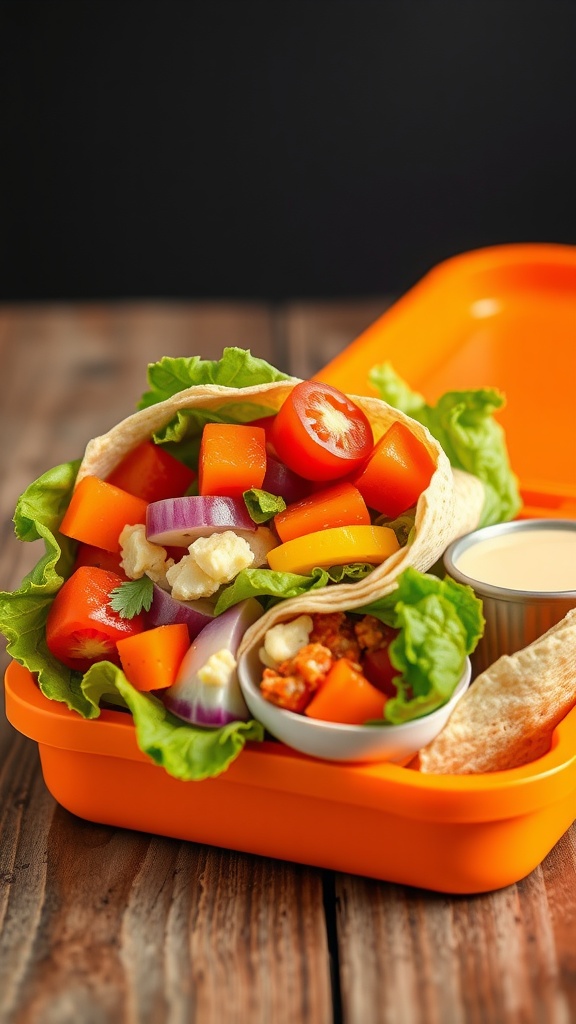
Rainbow veggie wraps are a colorful, tasty, and healthy lunch option that kids will love. These wraps are packed with a variety of fresh vegetables, creating a fun and vibrant meal that’s easy to make and customize. The combination of flavors makes every bite delightful, and the crunch of the veggies adds a satisfying texture. Plus, they are simple enough for kids to help prepare!
Using tortillas as a base, you can fill these wraps with a mix of your child’s favorite veggies, making lunch not only nutritious but also interactive. Serve them with a tasty dip or dressing on the side, and you have a winning lunchbox treat!
Ingredients
- 4 large tortillas
- 1 cup lettuce leaves
- 1/2 cup diced bell peppers (red, yellow, green)
- 1/2 cup diced cucumbers
- 1/2 cup shredded carrots
- 1/2 cup cherry tomatoes, halved
- 1/4 cup red onion, thinly sliced
- 1/2 cup hummus or ranch dressing
- Salt and pepper to taste
Instructions
- Prepare the Tortillas: Lay the tortillas flat on a clean surface.
- Add the Base: Spread a thin layer of hummus or ranch dressing on each tortilla, leaving a small border around the edges.
- Layer the Veggies: Evenly distribute the lettuce, diced bell peppers, cucumbers, shredded carrots, cherry tomatoes, and red onion over the tortillas.
- Season: Sprinkle with salt and pepper to taste.
- Wrap It Up: Roll the tortillas tightly, starting from one edge and tucking in the filling as you go. Slice the wraps in half diagonally.
- Pack for Lunch: Place the wraps in a lunchbox with a small container of extra dressing for dipping.
Veggie Mac and Cheese
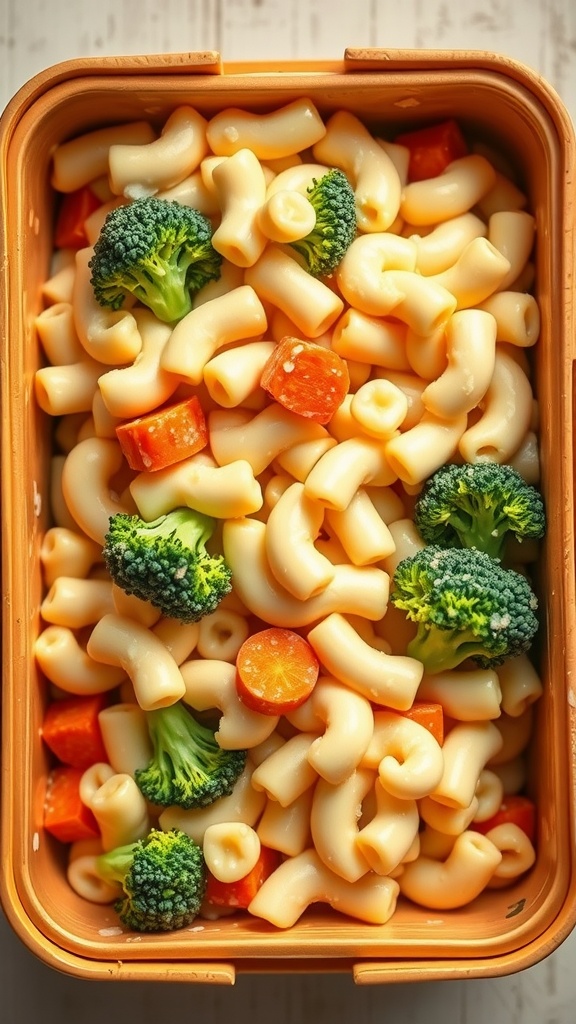
Veggie Mac and Cheese is a delightful twist on the classic comfort food that your kids will adore. It combines creamy, cheesy goodness with colorful vegetables, making it a nutritious option for lunchboxes. The blend of cheesy flavors with veggies like broccoli and carrots ensures every bite is both satisfying and healthy. Plus, it’s super easy to whip up!
This recipe takes just a short time to prepare, making it perfect for busy mornings. You can even make it ahead of time and pack it up for lunch, ensuring your little ones enjoy a wholesome meal at school.
Ingredients
- 2 cups elbow macaroni
- 1 cup broccoli florets
- 1 cup diced carrots
- 2 tablespoons butter
- 2 tablespoons all-purpose flour
- 2 cups milk
- 2 cups shredded cheddar cheese
- 1/2 teaspoon garlic powder
- Salt and pepper to taste
Instructions
- Cook the Pasta: In a large pot, boil salted water and cook the macaroni according to package instructions. Add broccoli and carrots in the last 2-3 minutes of cooking. Drain and set aside.
- Make the Cheese Sauce: In the same pot, melt butter over medium heat. Whisk in flour and cook for about 1 minute. Gradually add milk, whisking until thickened. Stir in cheese, garlic powder, salt, and pepper until melted and smooth.
- Combine: Add the cooked pasta and veggies to the cheese sauce. Stir until well coated. If needed, adjust seasoning.
- Serve or Store: Enjoy immediately or pack into lunchboxes for later. Reheat as needed.
Snackable Hummus Platter
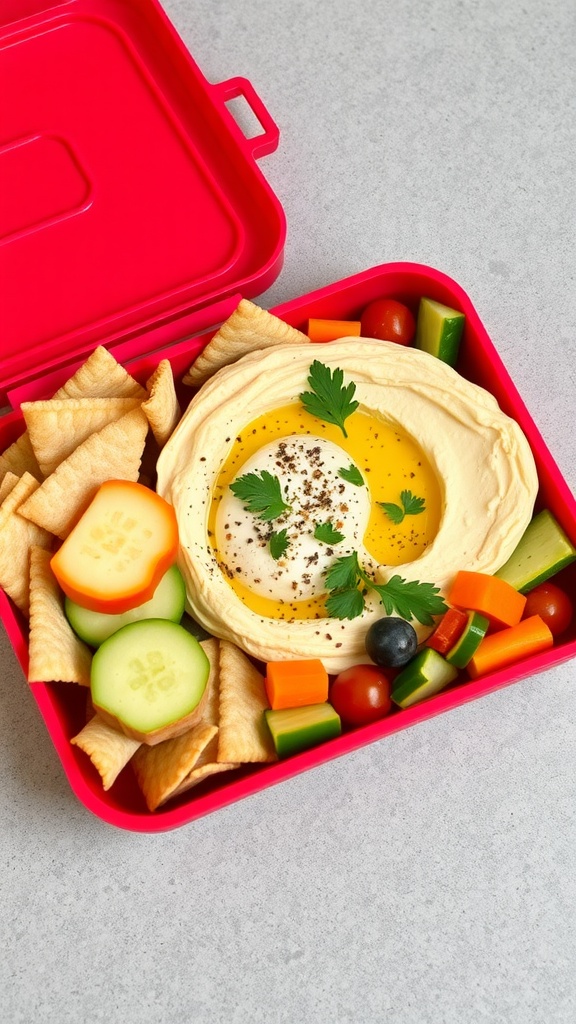
This snackable hummus platter is a colorful and tasty option for kids, combining creamy hummus with fresh veggies and crispy pita chips. It’s not only delicious but also packed with nutrients, making it a perfect lunchbox choice. Plus, it’s super easy to prepare, requiring minimal ingredients and effort.
The combination of flavors and textures makes it enjoyable for kids. They can dip, scoop, and munch on their favorites, keeping lunchtime fun and engaging. It’s a win-win for parents looking for healthy options that kids will actually eat!
Ingredients
- 1 cup hummus
- 2 tablespoons olive oil
- 1/4 teaspoon paprika
- 1 cup assorted fresh vegetables (like carrot sticks, cucumber slices, bell pepper strips, and cherry tomatoes)
- 1 cup pita chips
- Fresh parsley, for garnish
Instructions
- Prepare the Hummus: In a bowl, spread the hummus evenly. Drizzle the olive oil on top and sprinkle with paprika for an extra kick of flavor.
- Arrange the Veggies: Cut the vegetables into bite-sized pieces and arrange them around the hummus. Use a mix of colors to make it visually appealing.
- Add the Pita Chips: Place the pita chips in a separate section of the platter, allowing kids to dip them into the hummus.
- Garnish and Serve: Finish with a sprinkle of fresh parsley on top of the hummus for a pop of color. Pack it in a lunchbox or serve immediately!
DIY Taco Cups
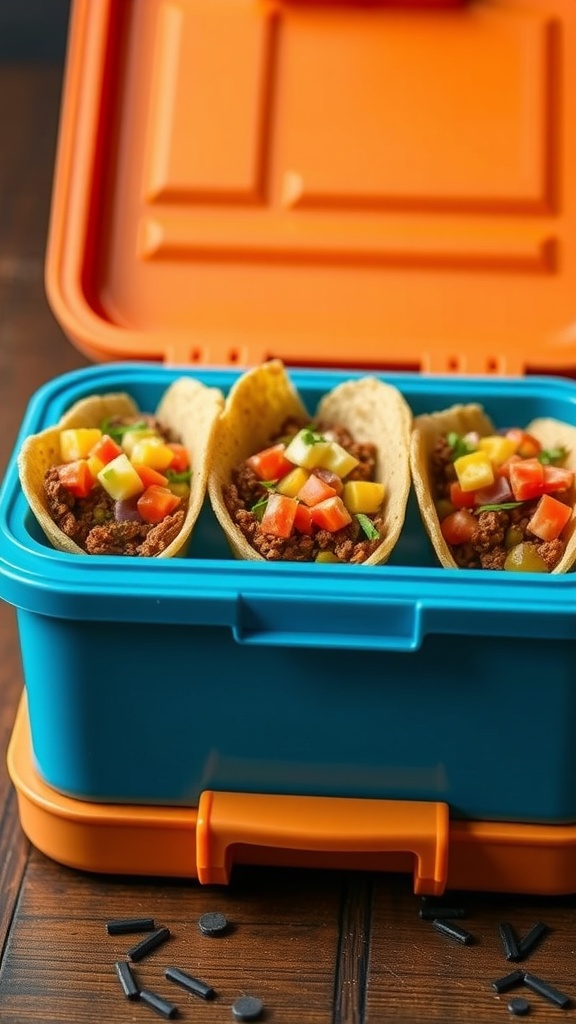
DIY Taco Cups are a fun and tasty way to pack lunch for your kids. These mini tacos are filled with flavorful ground meat and topped with fresh veggies. They’re easy to make and perfect for little hands to hold. Plus, they deliver a satisfying crunch that kids love!
Making Taco Cups is a simple process. You can customize them with your favorite fillings and toppings, allowing your kids to enjoy a lunch that’s both nutritious and delicious. It’s a great way to sneak in some veggies while providing a meal that feels like a treat.
Ingredients
- 1 pound ground beef or turkey
- 1 packet taco seasoning
- 12 small corn tortilla cups
- 1 cup shredded lettuce
- 1 cup diced tomatoes
- 1/2 cup shredded cheese
- 1/4 cup diced onions
- 1/4 cup sour cream (optional)
- 1/4 cup salsa (optional)
Instructions
- Cook the Meat: In a skillet over medium heat, brown the ground beef or turkey until fully cooked. Drain excess fat, if necessary. Stir in the taco seasoning and follow package instructions for additional liquid, if needed.
- Prepare the Taco Cups: Preheat your oven to 350°F (175°C). Arrange the tortilla cups in a baking dish. Fill each cup with the seasoned meat mixture.
- Bake: Place the filled taco cups in the oven and bake for about 10-15 minutes or until the edges become slightly crispy.
- Add Toppings: Remove from the oven and allow to cool slightly. Top each taco cup with lettuce, tomatoes, cheese, onions, and any other desired toppings.
- Serve: Let the kids enjoy their DIY Taco Cups warm or pack them in their lunchboxes for a fun meal on the go!
Turkey and Spinach Roll-Ups
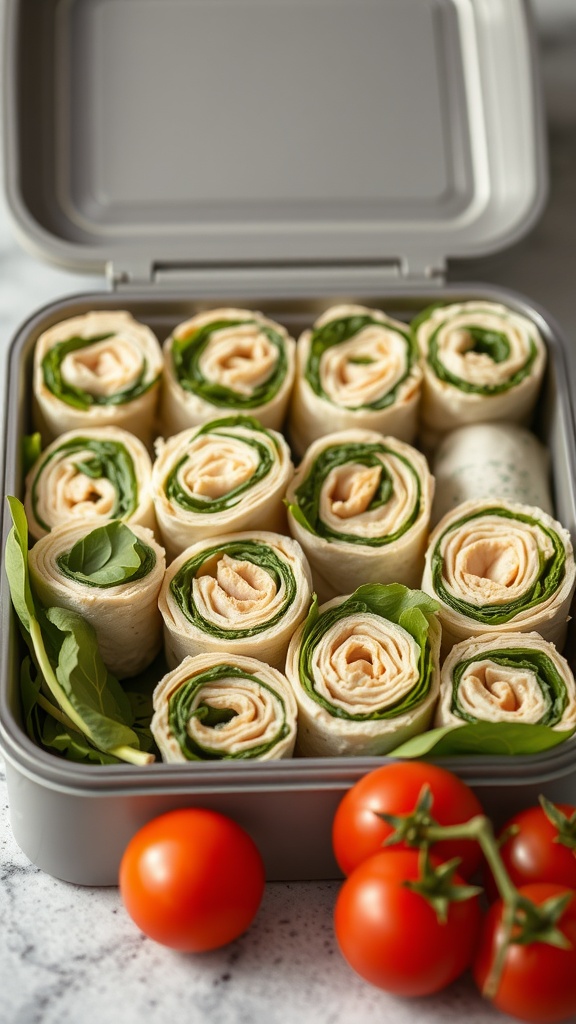
Turkey and spinach roll-ups are a tasty, healthy, and fun way to jazz up lunchboxes for kids. These wraps are packed with protein from the turkey and nutrients from the spinach, making them a smart choice for parents looking to fuel their kids for the day. Plus, they are super easy to make, which is always a win when you’re short on time!
These roll-ups have a delightful combination of flavors and textures. The mild, savory turkey complements the fresh, crunchy spinach, all wrapped snugly in a soft tortilla. Your kids will love the fun of eating them, and you’ll love how easy they are to prepare. Let’s get started on this quick and satisfying lunch idea!
Ingredients
- 4 whole wheat tortillas
- 8 ounces sliced turkey breast
- 2 cups fresh spinach leaves
- 1/2 cup shredded cheese (cheddar or mozzarella)
- 1/4 cup hummus or cream cheese
- 1/2 red bell pepper, thinly sliced (optional)
Instructions
- Spread a thin layer of hummus or cream cheese on each tortilla.
- Layer the sliced turkey, spinach leaves, shredded cheese, and bell pepper on top of the spread.
- Starting at one end, tightly roll the tortilla, encasing the filling. Slice into bite-sized pieces.
- Wrap in plastic wrap or store in a lunchbox until ready to eat.
Chicken Salad Lettuce Wraps

Chicken salad lettuce wraps are a tasty and fun way to enjoy lunch. They’re light, fresh, and packed with flavor, making them a hit with kids and adults alike. The crisp lettuce leaves provide a perfect vessel for a creamy chicken salad, giving each bite a satisfying crunch.
This recipe is super easy to make. You just combine cooked chicken with your favorite add-ins like fruits, nuts, and a simple dressing. It’s a great way to use up leftover chicken, and you can customize it to suit your kids’ tastes. Plus, they’re perfect for lunchboxes!
Ingredients
- 2 cups cooked chicken, shredded
- 1/2 cup plain yogurt or mayonnaise
- 1/4 cup diced apples
- 1/4 cup chopped celery
- 1/4 cup chopped grapes
- 1 tablespoon mustard
- Salt and pepper to taste
- 1 head of lettuce (such as romaine or butter lettuce)
Instructions
- In a mixing bowl, combine the shredded chicken, yogurt or mayonnaise, diced apples, chopped celery, chopped grapes, mustard, salt, and pepper. Mix well until all ingredients are evenly coated.
- Carefully separate the lettuce leaves and wash them under cold water. Pat dry with a paper towel.
- Spoon the chicken salad mixture into the center of each lettuce leaf.
- Wrap the lettuce around the chicken salad, or serve them open-faced for easy eating. Enjoy!
Cucumber and Cream Cheese Sandwiches
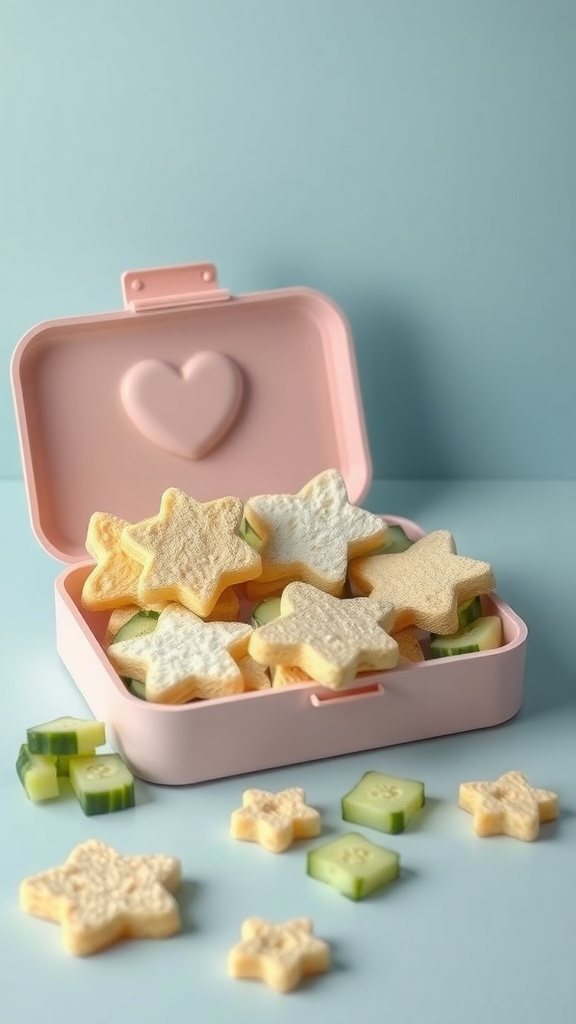
Cucumber and cream cheese sandwiches are a refreshing and delightful addition to any lunchbox. They offer a crisp, cool flavor that kids will enjoy, combining the creamy texture of the cheese with the crunch of fresh cucumbers. These sandwiches are not only simple to make but also allow for creativity in presentation. You can use cookie cutters for fun shapes, making lunchtime even more exciting!
Perfect for a quick meal or snack, these sandwiches pack well and stay fresh. They’re also a great way to sneak in some veggies without your kids even realizing it. Plus, they can be prepared in just a few minutes!
Ingredients
- 4 slices of soft bread
- 4 ounces cream cheese, softened
- 1 medium cucumber, thinly sliced
- Salt and pepper to taste
- Optional: fresh herbs (like dill or chives) for added flavor
Instructions
- Spread a layer of softened cream cheese evenly over each slice of bread.
- Place cucumber slices on two of the bread slices, overlapping them slightly.
- Sprinkle a little salt and pepper over the cucumbers for added taste.
- Top with the remaining two slices of bread, cream cheese side down.
- Using a cookie cutter, cut the sandwiches into fun shapes.
- Serve immediately or pack into lunchboxes for a tasty treat!
Ants on a Log
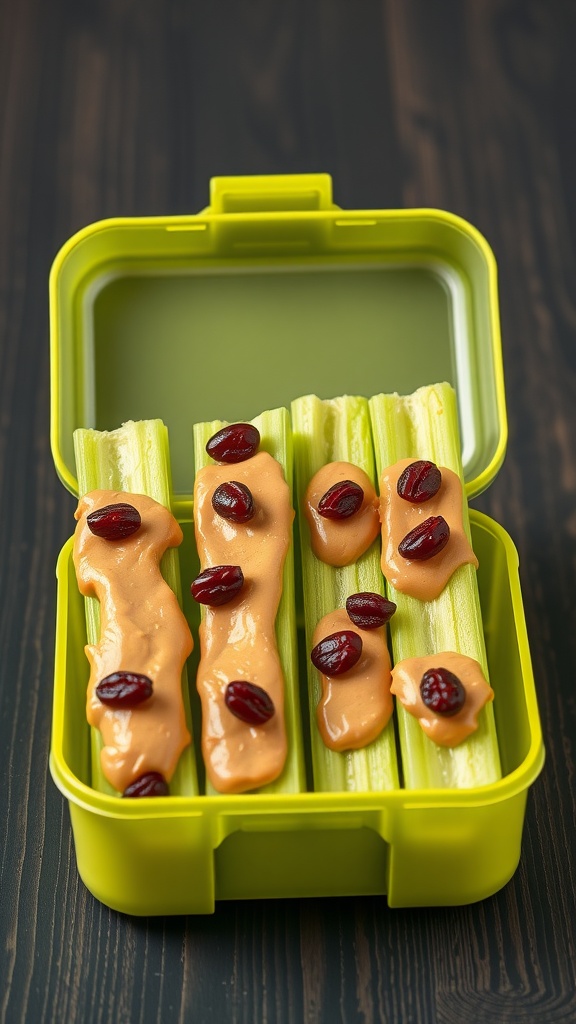
Ants on a Log is a delightful and healthy snack that kids adore. This fun recipe combines crunchy celery sticks with creamy peanut butter and sweet raisins, making it both nutritious and tasty. It’s simple to make, which is a win for busy parents!
This classic snack is not only visually appealing but also a great way to sneak in some veggies. The crunchy texture of the celery, paired with the smooth peanut butter and chewy raisins, creates a flavor combination that kids will love. Plus, it’s a breeze to prepare, making it a perfect addition to any lunchbox!
Ingredients
- 4 celery stalks
- 1/2 cup peanut butter
- 1/4 cup raisins
Instructions
- Wash and cut celery stalks into 3-4 inch pieces.
- Spread peanut butter generously inside each celery stick.
- Top with raisins to resemble ants.
- Pack in a lunchbox or enjoy immediately!
Apple and Almond Butter Dip
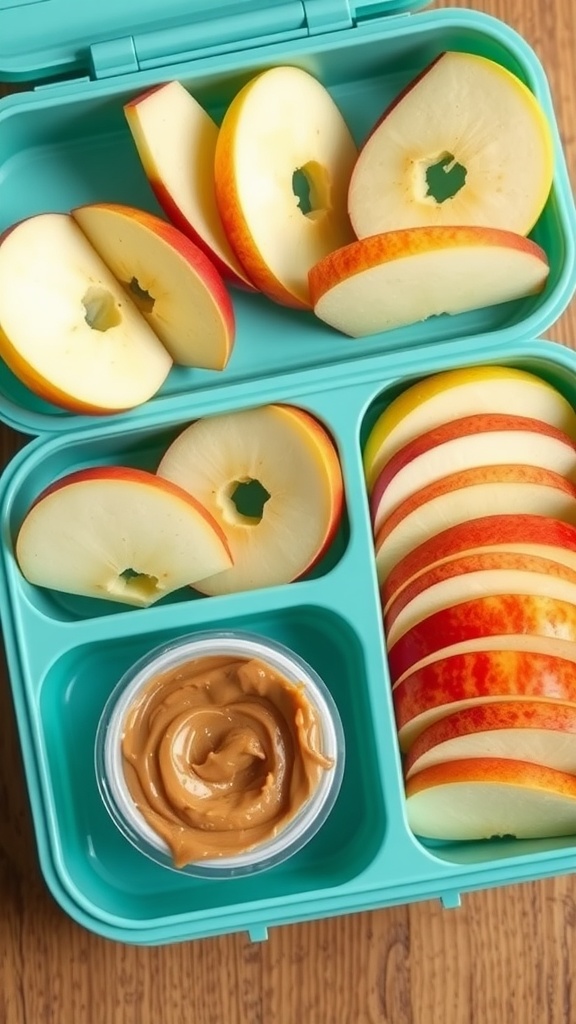
This Apple and Almond Butter Dip is a fun, nutritious option for kids’ lunchboxes! It combines the crisp sweetness of fresh apple slices with the creamy richness of almond butter, making it a delicious and satisfying snack. Plus, it’s super simple to prepare, requiring just a few minutes to slice the apples and scoop the almond butter.
The taste is a delightful mix of sweet and nutty, with a satisfying crunch from the apples. It’s a great way to sneak in some fruit and protein, keeping kids energized and ready for their day. This combination is not only tasty but also packed with vitamins and healthy fats!
Ingredients
- 2 medium apples (any variety)
- 1/4 cup almond butter
- 1 teaspoon lemon juice (optional, to prevent browning)
Instructions
- Wash and core the apples, then slice them into wedges or rounds.
- If desired, toss the apple slices with lemon juice to keep them from browning.
- Pack the apple slices in one compartment of a lunchbox and the almond butter in a small container.
- Serve chilled and enjoy!
Yogurt Parfait with Granola and Berries
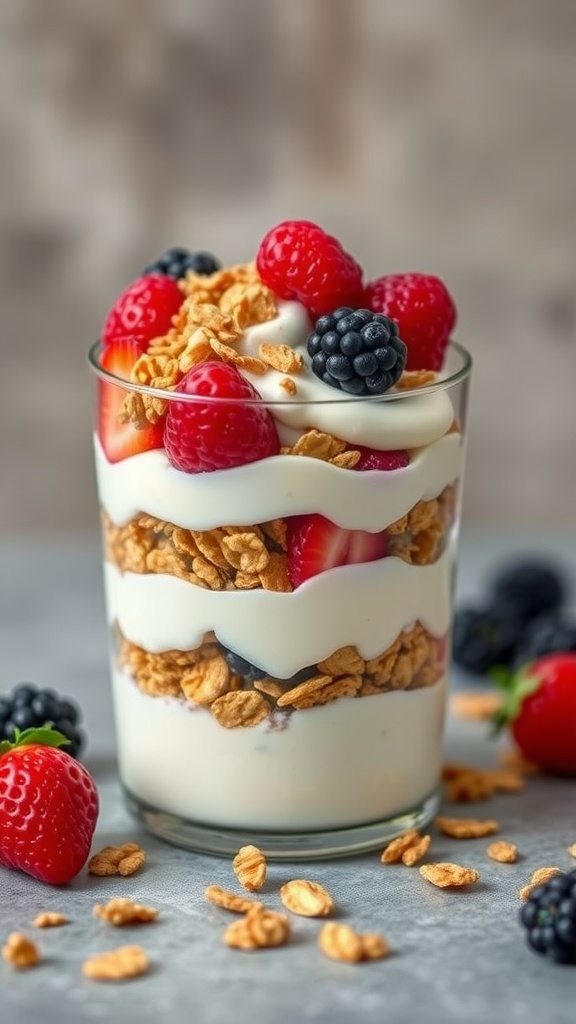
A yogurt parfait is a fantastic way to combine flavors and textures that kids will love. Creamy yogurt layered with crunchy granola and fresh berries creates a delicious and healthy treat. Plus, it’s super simple to whip up, making it perfect for busy mornings or lunchtime packing.
This parfait is not only tasty but also customizable. You can choose your favorite types of yogurt, whether it’s Greek, low-fat, or plant-based. The combination of sweet and tart berries will make each bite exciting. Kids will enjoy the fun layers, and you’ll love how easy it is to prepare!
Ingredients
- 2 cups yogurt (any flavor)
- 1 cup granola
- 1 cup mixed berries (strawberries, blueberries, raspberries, blackberries)
- Honey or maple syrup (optional)
Instructions
- Start by selecting your favorite glass or bowl. Spoon a layer of yogurt into the bottom.
- Add a layer of granola over the yogurt.
- Top with a layer of mixed berries.
- Repeat the layers until you reach the top of the glass, finishing with berries and a sprinkle of granola.
- If desired, drizzle a little honey or maple syrup on top for added sweetness.
- Serve immediately or cover and refrigerate for later enjoyment.
Sweet Potato and Black Bean Tacos
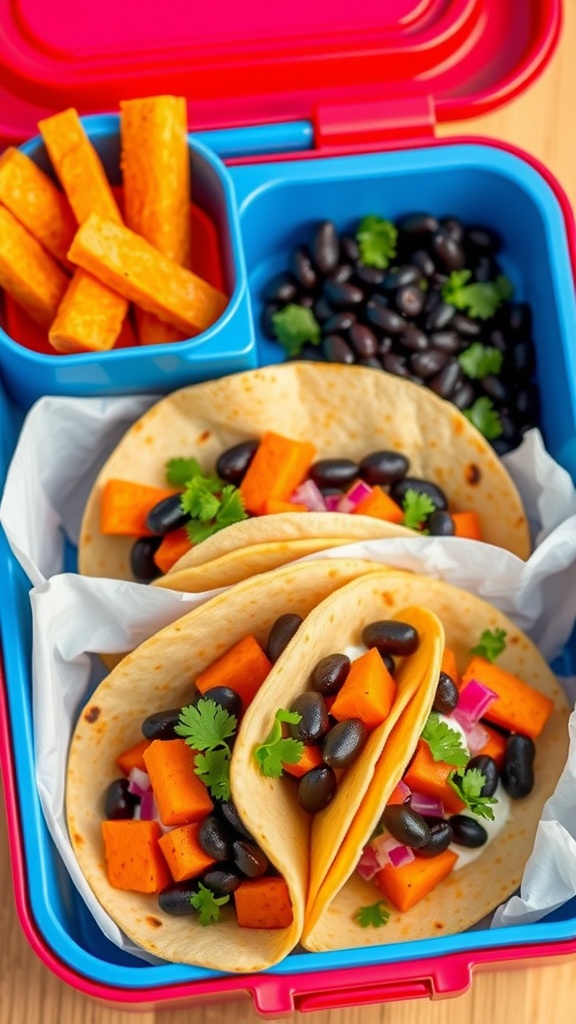
These Sweet Potato and Black Bean Tacos are a delightful option for lunchboxes that kids will adore! They combine the natural sweetness of roasted sweet potatoes with the hearty texture of black beans. This dish is not only tasty but also colorful and nutritious, making it a hit for picky eaters and health-conscious parents alike.
Plus, this recipe is super simple to whip up! You can bake the sweet potatoes ahead of time and throw everything together in a flash. Just pack them in tortillas with your favorite toppings, and you’ve got a fun, delicious lunch that brings smiles all around.
Ingredients
- 2 medium sweet potatoes, peeled and diced
- 1 can black beans, drained and rinsed
- 1 teaspoon olive oil
- 1 teaspoon cumin
- Salt and pepper to taste
- Tortillas (corn or flour)
- Diced red onion
- Fresh cilantro, for garnish
- Optional toppings: avocado, salsa, or cheese
Instructions
- Preheat your oven to 400°F (200°C). Spread the diced sweet potatoes on a baking sheet, drizzle with olive oil, and sprinkle with cumin, salt, and pepper. Toss to coat.
- Bake for about 25-30 minutes, or until the sweet potatoes are tender and lightly caramelized.
- In a bowl, mix the roasted sweet potatoes with the black beans. Heat tortillas in a skillet or microwave until warm.
- Assemble tacos by spooning the sweet potato and black bean mixture into each tortilla. Top with diced onions, cilantro, and any additional toppings you like.
- Serve immediately or pack them in lunchboxes for a tasty meal on the go!
Sushi Rolls with Veggies
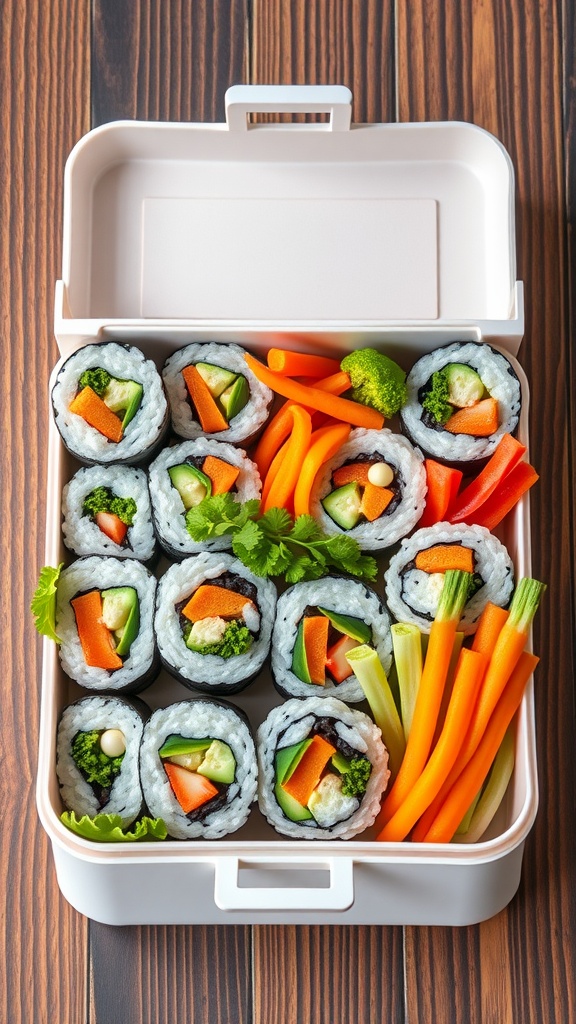
These veggie sushi rolls are a fun and colorful addition to any lunchbox. They’re packed with fresh vegetables and wrapped in soft rice, making them a tasty and healthy option that kids will love. Not only are they delicious, but they’re also simple to make, perfect for involving the little ones in the kitchen.
The combination of flavors from the assorted vegetables creates a satisfying crunch that’s hard to resist. Plus, they look great and can be customized with your child’s favorite veggies!
Ingredients
- 1 cup sushi rice
- 1 1/4 cups water
- 2 tablespoons rice vinegar
- 1 teaspoon sugar
- 1/2 teaspoon salt
- 4 sheets nori (seaweed)
- 1/2 cucumber, julienned
- 1 carrot, julienned
- 1/2 bell pepper, thinly sliced
- 1/2 cup broccoli florets, steamed
- Soy sauce for dipping (optional)
Instructions
- Cook the Sushi Rice: Rinse the sushi rice under cold water until the water runs clear. Combine the rice and water in a pot and bring to a boil. Once boiling, cover and reduce heat to low. Cook for 20 minutes, then remove from heat and let it sit covered for 10 minutes.
- Season the Rice: In a small bowl, mix rice vinegar, sugar, and salt until dissolved. Stir this mixture into the cooked rice and let it cool slightly.
- Prepare the Sushi: Lay a sheet of nori on a bamboo mat or a clean surface. Spread a thin layer of rice over the nori, leaving about an inch at the top edge. Arrange a few pieces of cucumber, carrot, bell pepper, and broccoli in a line across the rice.
- Roll It Up: Starting from the bottom, roll the sushi tightly, tucking in the filling as you go. Use a little water on the top edge of the nori to seal the roll.
- Slice and Serve: Cut the sushi roll into bite-sized pieces with a sharp knife. Serve with soy sauce for dipping if desired.